User On-Boarding with CIAM
The first step in every new CIAM process is user registration. The goal of this phase is to add and manage new users. Recently, we added significant improvments in order to make the registration process easier and avoid the abandon of the registration process from the users, which will have a negative impact on the business. It is important that registration must be as user-friendly and simple as possible while collecting valuable customer identity data. We provide users with multiple registration options, such as:
- Self-service registration: where a user completes his registration on his own using the default capabilities provided by the CIAM
- API Registration: where an administration account adds a user by calling a standard API
- Bulk registration: where the users are listed in a CSV file that will be sent to a CIAM manager
Warning
Creating a custom form inside the Client, to allow the user self-registration, IT IS NOT the correct way to proceed. The user can only self-register himself using the form of the CIAM platform.
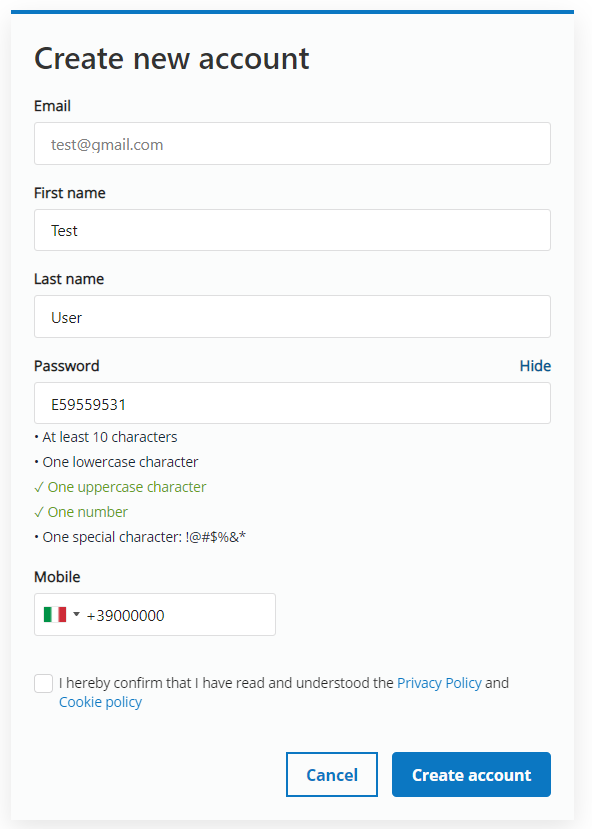
Self-Service registration
Self-service registration is the most common method for registering external users, allowing them to self-register for a user account and provide their identity data. A self-service registration form expects components such as first name, last name, password, and mobile phone number. The form has been agreed with the UX/UI team and it requires only the fields necessary to create an account. The type of data that is possible to collect with CIAM is broader. There is a general consensus on what information is deemed important and what is ancillary information. Indeed, data collected at registration is dependent on the type of service or information the user is requesting.
Note
The purpose of the CIAM is to confirm the user identity (authentication). While authorization is the process of verifying what the user have access to. Collecting more about the users is related to their profiling and to what they can do when authenticated.
When a user self-registers, the self-registration process creates the user account and locks the account until the user confirms account ownership via the confirmation mail that CIAM sends.
Warning
If a user does not confirm account ownership before the specified expiry period, the user account is locked assuming that the expired account is not owned by the creator Self-registration form is accessible by clicking on Register Now button below the login page.
Once the user inserts his email in username field and completes the form with his information an email is sent to confirm the email address.
API Registration
The API can be called in order to perform CRUD tasks in CIAM. To use the CIAM APIs it is necessary to subscribe to the API in WFP Gateway.
How to register an application
First of all, it is necessary to visit the WFP API Catalog and login with your WFP Active Directory credentials. The necessary steps for registering a new application are described, with great detail, in step-by-step guide to the creation of a new application and APIs subscription.
Tip
It's not required, but it is strongly suggested to create an application for every environment you'll call from (prod, qa, training, etc).
Warning
to obtain the formal approval to use CIAM API, it is required a formal access request via email or Azure DevOps to be forwarded to actual service providers for approval.
Token generation
The call to generate scoped tokens is very similar to the basic one, you have to add just the scope parameter containing a spaced list of desired scopes. Scopes used by CIAM to use APIs follow the naming convention
ciam_<application-name>-users_post and ciam_<application-name>-users_delete
To generate the token follow these simple steps:
curl -x POST https://api.wfp.org/token \
  -d "grant_type=client_credentials
  &scope= ciam_farm2go-users_post ciam_farm2go-users_delete" \
  -H "Authorization: Basic base64-encoded-credentials"
{
  "access_token":"0000-1111-2222-3333",
   "scope":" ciam_farm2go-users_post ciam_farm2go-users_delete ",
   "token_type":"Bearer",
   "expires_in":2916
}
Warning
To call the API every application has to choose one or more administration users who have the permission to provisioning/delete users. Those users can be both internal (WFP users) or external. To add administrative permissions, it is necessary to send an email to digital core administrators specifying the application in which the user has those permissions.
Example of API Calls
Adding a new user
The API call must have the header ciam-authorization which contains the access-token generated by the CIAM after a successful login with the above-mentioned administator user:
POST /ciam/<version>/<application-name>/users
Host: api.wfp.org
Authorization: Bearer <bearer token>
ciam-authorization: <CIAM Access token>
Content-Type: application/json

{
  "email": "test@test.org",
  "firstName": "Test",
  "mobileNumber": "+12345678",
  "lastName": "User",
  "redirect_homepage": "https://test.wfp.org"
}
If the user already exists, the API only adds the permission to that user to login into the application, otherwise the user will be created and a confirmation email with a change password request will be sent. In both cases the API will grant the permission to login into the application. The only mandatory field of the API is the email, but in case the user does not exist, all the fields should be inserted. In the body there is also the optional parameter redirect_homepage which is used as a redirectional URL when the user does not exist and set the password for the first time.
Removing a user permission
To call the API to remove the permission to a user to login into an application it is necessary to have the administration permissions on that application. The API call must have the header ciam-authorization which contains the access-token generated by the CIAM after a successful login
DELETE /ciam/<version>/<application-name>/users/<user-email>
Host: api.wfp.org
Authorization: Bearer <bearer token>
ciam-authorization: <CIAM Access token>
Content-Type: application/json
bulk registration
In addition to manually adding individual users, it is possible to import multiple users in bulk by creating a CSV file with the following format:
UserName,Password,Claims
name1@domain.org,Password1,http://wso2.org/claims/givenname=test
name2@domain.org,Password2,http://wso2.org/claims/lastname=user
name3@domain.org,Password3,http://wso2.org/claims/identity/askPassword=true,http://wso2.org/claims/role=role_name
Note
In the example above the first two users will be created with a fixed password. Instead, the last one, will be created with the Ask password option, where an email will be sent to the user to confirm his email and change his password. Note that the first line of the file will not be imported considering that it is not a username
It is possible to add user information in the CSV file by adding user claims. Shown below the available user Claims:
| Claim Name | Information Mapped |
|---|---|
| http://wso2.org/claims/givenname | First Name |
| http://wso2.org/claims/lastname | Last Name |
| http://wso2.org/claims/telephonee | Telephone Number |
| http://wso2.org/claims/mobile | Mobile Number |
| http://wso2.org/claims/role | Belonging group |
Other information can be requested to be added in CIAM. An example of user with more than one claim with the Ask Password option is:
UserName,Password,Claims
name1@domain.org,Password,http://wso2.org/claims/role=role1,http://wso2.org/claims/givenname=Test,http://wso2.org/claims/lastname=User,http://wso2.org/claims/telephone=+1234567, http://wso2.org/claims/mobile=+1234567,http://wso2.org/claims/identity/askPassword=true
Note
The role represents the permission to login into an application, users with roles will be imported only if the CSV file will be sent by the administrators of the application.