CIAM Autentication Flows
This section describes the procedures for implementing the authentication flows related to the login patterns described in Login Methods. CIAM implements OAuth 2 specifications to provide third party applications a controlled access to secure resources. Below, some concepts that can help in understanding the flows that will be described.
- Authorization Server:Is a system entity that creates, maintains, and manages identity information while providing authentication services to relying applications within a federation or distributed network. Identity providers offer user authentication as a service. Relying party applications, such as web applications, outsource the user authentication step to a trusted identity provider. Such a relying party application is said to be federated, that is, it consumes federated identity.
- Resource Owner:It is an entity able of granting access to protected resources
- Resource Server: Server that is responsible for security of protected informations and handles requests for access
- Client (Web application/Mobile Application):Application that wants to access the Resource Server and perform actions on behalf of the Resource Owner
Scopes and Tokens
CIAM uses Scopes and tokens to implements granular access controls. Together they represent a “permission to do something.” These two elements, together, decide whether a user can access (token) a set of resources made available by the service provider and exactly which ones (scope).
The authorization server (CIAM) operates validating and authorizing the client whereas the resource server hosts the resources being requested. The resource server wants to know if the requestor is authorized to get information and it wants to know additional information on his identity (claims). By using tokens as a proxy, the need for providing credentials is abstracted. Access tokens are commonly issued as JWT Bearer Token. These tokens are cryptographically signed to be meaningless to the client, but when decoded by the resource server, they contain important information. One of the variables included within the access token is its scope. Scopes could be of the types: read, write, read and write or no access. To get user claim starting from the access token it is necessary to make a REST call to the respective endpoint as follow:
curl -x GET \
  https://ciam.auth.wfp.org/oauth2/userinfo \
  -H 'Authorization: Bearer <access_token>'
The response will be formatting as follow:
{
  "given_name": "John",
  "family_name": "Smith",
  "sub": "johnsmith@test.org"
}
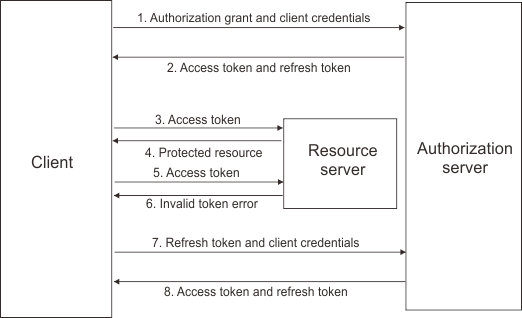
There is another type of token called refresh tokens. They are not “keys” to access resources, but are used to automatically obtain new access tokens when they are no longer functional. Refresh tokens have an important feature: they can be revoked by invalidating them and walking back client access to privileged resources
JWT Bearer Token
JSON Web Tokens consist of three parts separated by dots (.) and base64 encoded, which are:
- Header
- Payload
- Signature
The header consists of two parts: the key id, used for validating signature, and the signing algorithm being used, RS256 in this case. The second part of the token is the payload, which contains the claims. Claims are statements about a user and additional data. There are two types of claims: registered and private claims:
- Registered claims: These are a set of predefined claims, to provide a set of useful, interoperable claims. Some of them are: iss (issuer), exp (expiration time), sub (subject), aud (audience), and others;
- Private claims: These are the custom claims created to share information between parties that agree on using them and are neither registered or public claims.
An example of payload could be:
{
  "aud": "< oauth client id >",
  "sub": "testuser@test.org",
  "azp": "< oauth client id >",
  "amr": [],
  "iss": "https://ciam.auth.wfp.org/oauth2/token",
  "given_name": "Test",
  "family_name": "User",
  "exp": 1568388679,
  "iat": 1568385079,
}
The last part of the response is the signature and it is used to verify the message wasn't changed along the way, and, in the case of tokens signed with a private key, it can also verify that the sender of the JWT is who it says it is. CIAM endpoint used to verify JWT Token is https://ciam.auth.wfp.org/oauth2/jwks
OpenID Credentials
OpenID Connect (OIDC) is a simple identity layer on top of the OAuth 2.0 protocol. It allows software solutions to verify the identity of the user based on the authentication performed by an Authorization Server as well as to obtain basic profile information about the user. To obtain OpenID Credentials is necessary to request a “client key” and “client secret” for the application. The request must contain:
- Callback URL: URL to which the credentials are returned once the user is authenticated
- Application Type: if the application is a web application or a native application (mobile)
- Requested user information (First Name, Last Name etc.)
Information about the various OpenID Connect endpoints through JSON file are available on CIAM OpenID Configuration
Single-Authentication factor vs Multi-Factor Authentication
Single-factor authentication is the simplest form of authentication methods. With SFA, a person matches one credential to verify herself or himself online. CIAM uses the username and password credentials. Most cases and applications are fine with this authentication method.

When the user clicks on Sign in button the Authorization Server checks the user identity against the provided credentials.
Multi-factor authentication uses a combination of the following factors: something you know, something you have and something you are. CIAM uses 2FA a subset of MFA, where the user provides the same password/username combination, but with the addition of being asked to verify who a person is by using something only he or she owns, such as a mobile device. 2FA scenarios in CIAM include:
- Email One Time Password; and
- SMS One Time Password.
A one-time password (OTP) is a password that is valid for only one login session or transaction. 2FA can be used independently in each application that login through CIAM and every authentication step can be enabled for all or for a subset of users based on their information (age, domain, IP, etc.) or based on their IDP. For example, it is possible to have a flow as follow: 1. The user chooses between the login with WFP or non-business account; 2. If user chooses WFP AD once inserted credentials receives an SMS with OTP; 3. If user instead chooses non-business login once inserted credentials receives an email with OTP
Authorization Code Grant
Grants dictate the order of operations for a client to obtain an access token. These unique orderings are called flows. Authorization code grants are the privileged grant type by TECI. In essence, the client receives a unique code issued by the authorization server, which is then exchanged for a token. By breaking up the steps required to receive the token into two distinct queries, the authorization server is able to verify important information about the client before issuing the token. After that the users have been successfully logged in, user information is sent back to the application. Using authorization code flow, CIAM will respond with a code, which the client can exchange for tokens on a secure channel. This flow should be used when the application code runs on a secure server (common for MVC and server-rendered pages apps).
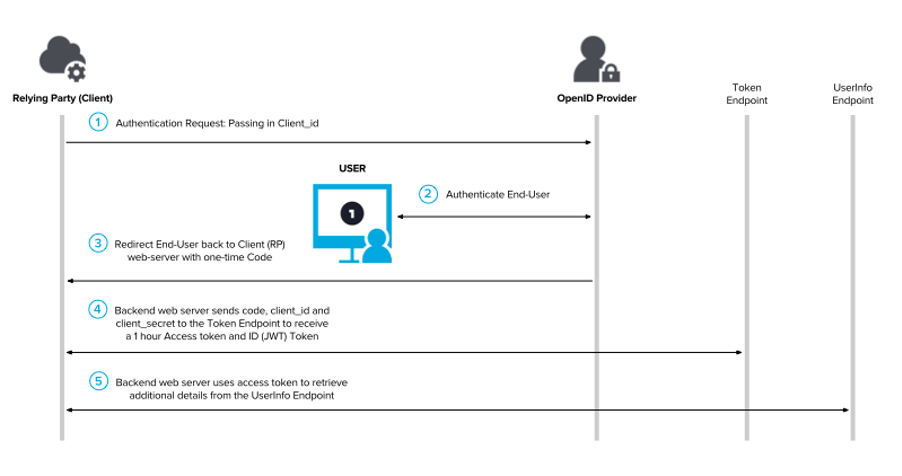
The first step of the Authorization code flow is to request authorization from the user. This is accomplished by creating an authorization request link for the user to click on. The authorization URL is in a format such as:
https://ciam.auth.wfp.org/oauth2/authorize?client_id=<oauth client id>
&redirect_uri=<callback url>
&scope=openid
&response_type=code
The server will redirect back to the app, with a code. It is important to note that this is not an access token. The only thing that is possible to do with the authorization code is to make a request to get an access token and the JWT token by making a call to the token endpoint:
curl -x GET \
  https://ciam.auth.wfp.org/oauth2/token \
  -H 'Contet-Type: application/x-www-form-urlencoded'
  -d 'grant type=authrization_code&code=<received authorization code>&client_id=<oauth client id>&client_secret=<oauth client secret>&redirect_uri=<redirect url>'
This call will return a json with:
- access_token: token used as a credential when calls CIAM APIs
- refresh_token: token used to exchange a refresh token for an access token when it has expired
- id_token: is the JWT token that contains all the user information
Authorization Code Flow with Proof Key for Code Exchange (PKCE)
This is a variant of the authorization code grant used for public clients that cannot be trusted to store credentials. Using the PKCE extension (Public Key for Code Exchange), the client and servers transfer a hash to verify that communications are not intercepted. It is a stronged suggested pattern during authentication of mobile/native applications. They can use the OAuth 2.0 Authorization Code Flow, but they require additional security because they
- Cannot securely store a Client Secret. Decompiling the app will reveal the Client Secret. The Client Secret is bound to the app and is the same for all users and devices; and
- may make use of a custom URL scheme to capture redirects (e.g., MyApp://) potentially allowing malicious applications to receive an Authorization Code from your Authorization Server.
The PKCE Flow introduces a secret created by the calling application that can be verified by the authorization server; this secret is called the Code Verifier. Additionally, the calling app creates a transform value of the Code Verifier called the Code Challenge and sends this value over HTTPS to retrieve an Authorization Code. This way, a malicious attacker can only intercept the Authorization Code, and they cannot exchange it for a token without the Code Verifier.

With PKCE, the client sends the following two additional parameters when requesting an authorization code:
| Parameter | Description |
|---|---|
| code_challenge | The client creates and records a secret cryptographically random string (the code_verifier), which is then encoded using URL safe base64 encoding to transform it into the code_challenge |
| code_challenge_method | This is the method used to transform the code_verifier into the code_challenge. It is sent as the hash algorithm name that was used for the hashing. When the authorization code is being issued, this method is used by the token endpoint to verify the code_verifier value |
- code_verifier: The code verifier should be a high-entropy cryptographic random string with a minimum of 43 characters and a maximum of 128 characters. Should only use A-Z, a-z, 0–9, “-”(hyphen), “.” (period), “_”(underscore), “~”(tilde) characters
- code_challenge: The code challenge is created by SHA256 hashing the code_verifier and base64 URL encoding the resulting hash Base64UrlEncode(SHA256Hash(code_verifier). In the case that there is no such possibility ever to do the above transformation it is okay to use the code_verifier itself as the code_challenge
- code_challenge_method: This is an optional parameter. The available values are “S256” when using a transformed code_challenge as mentioned above. Or “plain” when the code_challenge is the same as the code_verifier. Since this is an optional parameter, if not sent in the request the Authorisation Server will assign “plain” as the default value
Below the are some example on how to implemet PKCE code flow with CIAM.
- First create a PKCE code verifier and a code challenge:
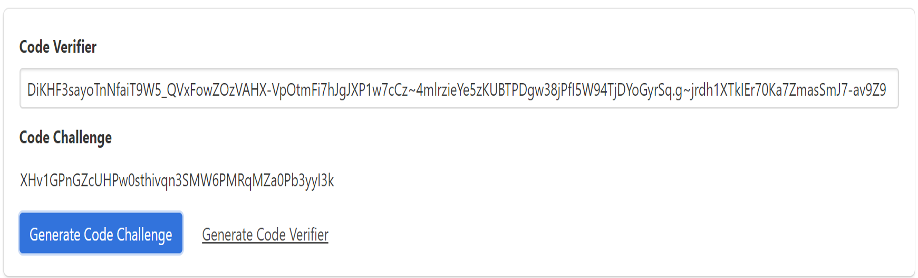
The code challenge here is the base64 URL encoded value of the SHA256 hashed code_verifier so the code challenge method will be S256.
- The authorization request of the Authorization Code flow with PKCE looks like below:
https://ciam.auth.wfp.org/oauth2/authorize?response_type=code
&client_id=<OAuth_Client_Key>
&redirect_uri=<Callback_Url>
&state=<Random_String>
&code_challenge=<Code_Challenge>
&code_challenge_method=<Code_Challenge_Method>
- A sample request is:
https://ciam.auth.wfp.org/oauth2/authorize?response_type=code
&client_id=X_evTCx5txiXfpMLdYGs8zj7eTga
&redirect_uri=https://example.app.com/redirect
&state=JCyDD4q0VjoHsWdE
&code_challenge= XHv1GPnGZcUHPw0sthivqn3SMW6PMRqMZa0Pb3yyI3k
&code_challenge_method=S256
Like mentioned previously Code_Challenge_Method will be “S256”, this is also an optional parameter and if it's not sent “Plain” will be the default value (which means for the Authorisation Server your code verifier is the same as the code challenge).
Implicit Flow
The Implicit flow is a simplified OAuth flow that, in past, was recommended for native apps and JavaScript apps where the access token is returned immediately without an extra authorization code exchange step.
Note
It is not recommended to use the implicit flow due to the inherent risks of returning access tokens in an HTTP redirect without any confirmation that it has been received by the client. CIAM supports it for backwards compatibility and to meet that situations where is not possible to proceed with an Authorization Code Grant.

To begin the Implicit flow, the application constructs a URL like the following and directs the browser to that URL
https://ciam.auth.wfp.org/oauth2/authorize?client_id=<oauth client id>
&redirect_uri=<callback url>
&scope=openid
&response_type=<response type>
&nonce=< random value used to prevent replay attacks >
When the user visits this URL, the authorization server will present them with a prompt asking if they would like to authorize this application’s request and if the user approves the request, the authorization server will redirect the browser back to the redirect_uri specified by the application, adding a token and state to the fragment part of the URL:
| Response Type | Access-Token | JWT |
|---|---|---|
| id_token | x | issued |
| token | Issued | x |
| id_token token | issued | issued |
About Logout
CIAM allows you to construct a logout URL so that an application can redirect to a particular logout page when the client sends an OpenID Connect logout request. The following call is used to logout from the CIAM and redirect to a client application page:
https://ciam.auth.wfp.org/oidc/logout?id_token_hint=<id_token>&post_logout_redirect_uri=<redirect URI>
Underneath are the parameters you need to specify in the UR
| Parameter | Description |
|---|---|
| id_token_hint | The id_token returned by the identity provider in login phase |
| post_logout_redirect_uri | The URL to be redirected to when logging out. The value defined here should be one of the callbackURI of the client application |
Note
If post_logout_redirect_uri and id_token_hint parameters are not specified, users are redirected to the default logout success page of CIAM without be redirected
References
Everything You Need to Know About OAuth (2.0)
PKCE in Action with WSO2 Identity Server